Homemade Peppermint Marshmallows3/4 cup water4 packets Knox gelatin3 cups sugar3/4 cup water1/2 tsp salt1 1/4 cup light karo syrup1 Tbsp peppermint extract (optional)powdered sugar (for cutting)'Tis the season for hot chocolate! Three years ago I got pretty ambitious on the holiday treats I made for our friends and neighbors. I'll admit I was slightly intimidated at first, but these really were pretty simple to make. A little messy, but nothing that doesn't clean up in 5 minutes with a sponge. Initial prep time is 30 minutes. Then the mallows must sit for 10-12 hours before cutting. Final prep is another 30 minutes. This makes 48 - 60 mallows, depending on how large you cut them. Yummy when added to hot cocoa!Credit to Morgan at http://morganmoore.typepad.com/one_more_moore/ for inspiring me to try these. :)If you're interested, here are step by step instructions and photos I put together.
1) Place 3/4 cup water and 4 envelopes Knox Gelatin in mixer bowl to "bloom."2) Affix splash guard to mixer bowl so it will be ready when you add the hot syrup.3) Mix 3 Cups Sugar, 3/4 cup water, 1/2 tsp Salt and 1 1/4 Cups Karo Syrup in a medium sauce pan.4) Bring to boil with lid on and NOT stirring.
5) Once boiling, remove lid and continue to boil until syrup reaches soft ball stage (234 - 240 degrees). Do not stir.We ended up doing one peppermint batch and one vanilla batch. Here they are, ready for delivery!MERRY CHRISTMAS!
Showing posts with label foodie. Show all posts
Showing posts with label foodie. Show all posts
Sunday, November 14, 2010
Homemade Peppermint Marshmallows [Re-post]


Friday, April 16, 2010
My Very Own Sourdough Bread!
The highly anticipated [by me] inaugural loaf of sourdough has just come out of the oven! Woot, woot! And, get this....it does a little 'snap, crackle, pop' as it cools.

Yep, it's as delicious as it looks, even if I do say so myself! Jimmie agrees that it tastes as good as any San Francisco sourdough we've tried.
It's amazing to think there are only 3 ingredients in this bread: Flour, Water, Salt. That's it.
The starter contains only flour and water. I'm thrilled that I was able to cultivate wild yeast.  Here it is before I stirred the bubbles out of it.

I researched many different websites for the best method and no-knead recipe. Most of what I did came from Breadtopia. There are some very helpful videos on that site that actually show the entire process and give tips for caring for your starter.

Here it is before I stirred the bubbles out of it.I researched many different websites for the best method and no-knead recipe. Most of what I did came from Breadtopia. There are some very helpful videos on that site that actually show the entire process and give tips for caring for your starter.
Combine 3 1/2 cups of flour and 1 1/2 tsp salt in medium mixing bowl.
[I used 1/2 cup wheat flour and 3 cups bread flour.]
Stir the bubbles out of the starter so it deflates.
Measure 1/4 cup of starter.

Pour the starter into 1 1/2 cups purified water.

Stir until dissolved.

Pour water/starter mix into flour/salt mixture.

Combine until dough forms a ball. THAT is a danish dough whisk. Love it. When it gets to tough for the whisk, finish kneading with floured hands and form into a ball. Dough will be sticky.

Cover dough with plastic and let rise at room temperature for 18 hours.
Measure 1/4 cup of starter.
Pour the starter into 1 1/2 cups purified water.
Stir until dissolved.
Pour water/starter mix into flour/salt mixture.
Combine until dough forms a ball. THAT is a danish dough whisk. Love it. When it gets to tough for the whisk, finish kneading with floured hands and form into a ball. Dough will be sticky.
Cover dough with plastic and let rise at room temperature for 18 hours.
Sourdough is a day-ahead event!

This is what the dough looked like after 9 hours (when I woke up this morning).
This is what the dough looked like after 9 hours (when I woke up this morning).
9 more hours to go.

Here's the dough after rising at room temperature for 18 hours.

Gently turn the dough out onto a floured surface. It should be VERY sticky, which requires a lot of flower on your hands and sprinkling on the dough to handle and shape.

Carefully spread out (with floured fingers), not using a lot of pressure (maintaining some air in the dough).

Fold into thirds. (A dough scraper comes in very handy, because the dough is so soft and sticky that it is hard to lift with your fingers.)

Then fold in half. Now you have 6 layers of dough. It probably shouldn't have quite that much residual flour on it....I'm sure I'll get better at this with practice!


Carefully invert bowl so dough falls onto hot baking stone without burning your hands. Spray with a water bottle every minute for the first 5 minutes. Life will never be the same. Really. I'm so excited about how wonderfully this bread turned out that I've already made a second batch of dough to bake tomorrow and I may or may not be able to sleep tonight. Giddy.
Here's the dough after rising at room temperature for 18 hours.
Gently turn the dough out onto a floured surface. It should be VERY sticky, which requires a lot of flower on your hands and sprinkling on the dough to handle and shape.
Carefully spread out (with floured fingers), not using a lot of pressure (maintaining some air in the dough).
Fold into thirds. (A dough scraper comes in very handy, because the dough is so soft and sticky that it is hard to lift with your fingers.)
Then fold in half. Now you have 6 layers of dough. It probably shouldn't have quite that much residual flour on it....I'm sure I'll get better at this with practice!
Cover with plastic and let sit for 15 minutes.
Grease a bowl or proofing basket and sprinkle wheat bran to keep the dough from sticking. Use a dough scraper to carefully lift dough and place into bowl for proofing (not pictured). Gently shape it into a roundish blob. [If you put the seams of the dough up in the bowl, they'll end up on the bottom of your loaf of bread when you invert the bowl onto the baking stone. I'll remember that next time!] Cover with a wet towel and let rise for 1 1/2 - 2 hours. Check at 1 hour and if it looks like it's almost ready, start pre-heating oven and baking stone to 500 degrees (this takes about 30 minutes for me).

Grease a bowl or proofing basket and sprinkle wheat bran to keep the dough from sticking. Use a dough scraper to carefully lift dough and place into bowl for proofing (not pictured). Gently shape it into a roundish blob. [If you put the seams of the dough up in the bowl, they'll end up on the bottom of your loaf of bread when you invert the bowl onto the baking stone. I'll remember that next time!] Cover with a wet towel and let rise for 1 1/2 - 2 hours. Check at 1 hour and if it looks like it's almost ready, start pre-heating oven and baking stone to 500 degrees (this takes about 30 minutes for me).
Carefully invert bowl so dough falls onto hot baking stone without burning your hands. Spray with a water bottle every minute for the first 5 minutes.
Bake for 30 minutes at 500 degrees.
Then decrease heat to 450 and bake for 15 additional minutes.
Cool on wire rack.
Life will never be the same. Really. I'm so excited about how wonderfully this bread turned out that I've already made a second batch of dough to bake tomorrow and I may or may not be able to sleep tonight. Giddy.I can't wait to experiment with garlic sourdough, olive bread, jalapeno bread...you get the idea. No more $4 - 5 per loaf. I plan to teach Jimmie how to make it, too....teach a man to fish, right?! He's pretty excited that we could live on bread [using wheat from our food storage] if we had to. ;)
Tuesday, February 23, 2010
Kitchen Weapons
Looks like a weapon, doesn't it?
 Meet my new favorite tool.
I've been on the hunt for a meat tenderizer for the past several weeks. I found some pretty good deals on Amazon, but they all had one flaw noted in fine print: Do Not Place In Dishwasher. This would apparently ruin their shiny finish.
REALLY?? Why would I want a tool made for pounding raw meat that is not dishwasher safe? I'm not going to pound chicken with ANYthing that can't be tossed into the dishwasher.
Others at Target and Walmart that were dishwasher safe seemed light and inadequate.
So, I finally decided to splurge for this little beauty at Williams Sonoma.
 Nice and heavy. Big surface for even flattening. No more falling-apart-chicken breasts from pounding them unevenly with a can.
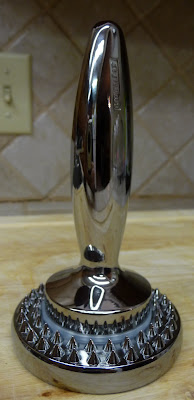 With a simple twist of the handle, you can flip over the surface and use the tenderizing side.
 Tough meat, no more!

Meet my new favorite tool.I've been on the hunt for a meat tenderizer for the past several weeks. I found some pretty good deals on Amazon, but they all had one flaw noted in fine print: Do Not Place In Dishwasher. This would apparently ruin their shiny finish.
REALLY?? Why would I want a tool made for pounding raw meat that is not dishwasher safe? I'm not going to pound chicken with ANYthing that can't be tossed into the dishwasher.
Others at Target and Walmart that were dishwasher safe seemed light and inadequate.
So, I finally decided to splurge for this little beauty at Williams Sonoma.
Nice and heavy. Big surface for even flattening. No more falling-apart-chicken breasts from pounding them unevenly with a can.With a simple twist of the handle, you can flip over the surface and use the tenderizing side.Tough meat, no more!I see more chicken parmigiana and grilled chicken in my immediate future!
Monday, February 22, 2010
Name that Gadget: Part 1
I picked up a new kitchen gadget today.
It's different.
A common tool, yet like none I'd seen before.
What is it?

Apparently, this one was too easy!
Yes, it's a meat tenderizer/pounder.
Sunday, February 21, 2010
Chipotle-Lime Grilled Chicken Salad
I am no culinary genius.
I'm more of a culinary copycat.
But, I know a good recipe when I try one, and that is the purpose of this blog!
I promise to share my best finds with you and try to include a photo whenever possible.
I've been thinking about chipotle all week, since I made white chicken chili last week. I came across this reipe on the Pioneer Woman's Tasty Kitchen. I changed enough that I'm going to list my own recipe below. Here's the link to the original.

I'm more of a culinary copycat.
But, I know a good recipe when I try one, and that is the purpose of this blog!
I promise to share my best finds with you and try to include a photo whenever possible.
I've been thinking about chipotle all week, since I made white chicken chili last week. I came across this reipe on the Pioneer Woman's Tasty Kitchen. I changed enough that I'm going to list my own recipe below. Here's the link to the original.
 Chipotle-Lime Grilled Chicken Salad
1/2 cup cilantro
1-2 Tbsp minced chipotle pepper in adobo sauce (two peppers...I minced them all and froze the rest)
1/8 tsp pepper
1/4 tsp salt
1/4 tsp garlic powder
1/2 tsp cumin
1 tsp sugar
1/2 cup olive oil
Juice of 1 lime (or 3 Tbsp lime juice)
Combine all of the above ingredients, whisking in the olive oil last.
Pour half of the vinaigrette into a container and marinate 2 chicken breasts for 1 hour or overnight. [I used my FoodSaver and it was ready in 20 minutes.] This is a pretty spicy dressing/marinade. Reduce chipotle to 1 Tbs for the faint of heart!
Grill chicken breasts, slice thinly and serve over salad.
Combine salad ingredients, which include:
1 head romaine lettuce or mixed greens
1-2 carrots, cut in half and shaved into peels
2 small tomatoes, diced
1/4 cup red onion, diced
1 avocado, diced
2 cups corn kernels, roasted [I fried frozen kernels in olive oil until brown and crispy-YUM! You could also broil on a baking sheet.]
You could add cotija or feta cheese, but I found cheese unnecessary, with so much flavor going on already.

Grill chicken breasts, slice thinly and serve over salad, dressing with remaining vinaigrette.
So good...it's what's for lunch tomorrow.
Wednesday, February 17, 2010
Sugar and Spice
 A few of my most recent discoveries in the land of sugar and spice:
#1) Course sugar sprinkled over cookies and pies. WHY had I not tried this before??
#2) Ground Chipotle Powder. Hard to find in grocery stores, but easy to make. I found a bag of dried Chipotle pods at a latin market and ground them in an electric coffee grinder. So. Good.
#3) Freshly ground Nutmeg is fresher and tastier than buying it in powder form. I stumbled across some whole nutmeg the other day and decided to try it. I have no idea how people do this without losing the skin from their fingers, but it SMELLS and TASTES so good.
Monday, February 15, 2010
Sheena's Black & White Chili
We tried Sheena's Black & White Chili recipe tonight. I think it might've killed me.....
......'cuz I've died and gone to heaven! Seriously better than ANY chicken tortilla soup I've ever had.
Who knew how important [and potent] ground Chipotle could be? Apparently, Sheena did! I couldn't find it locally, but I did find whole dried chipotle pods at Pueblo Market #2. I ground them into powder myself using a coffee grinder [but not before practically ruining my Cuisinart food processor and destroying my lungs by inhaling it]. But, I digress!
You can find her recipe HERE on her blog. I used about 3/4 Tbsp chipotle and it had some HEAT! Just enough bite and SO much flavor.
Her presentation is prettier than mine. I took this picture before I crumbled some Tostitos w/ Lime tortilla chips over the top of my bowl.

 We love all things: Avocado, Cilantro and Lime.
Add Chipotle to the list!
......'cuz I've died and gone to heaven! Seriously better than ANY chicken tortilla soup I've ever had.
Who knew how important [and potent] ground Chipotle could be? Apparently, Sheena did! I couldn't find it locally, but I did find whole dried chipotle pods at Pueblo Market #2. I ground them into powder myself using a coffee grinder [but not before practically ruining my Cuisinart food processor and destroying my lungs by inhaling it]. But, I digress!
You can find her recipe HERE on her blog. I used about 3/4 Tbsp chipotle and it had some HEAT! Just enough bite and SO much flavor.
Her presentation is prettier than mine. I took this picture before I crumbled some Tostitos w/ Lime tortilla chips over the top of my bowl.
 We love all things: Avocado, Cilantro and Lime.
Add Chipotle to the list!
Friday, January 29, 2010
Chicken Parmagiana
Weather like this makes me want to cook! Last night as the snow began to fall, I stumbled upon a recipe for Chicken Parmagiana on The Pioneer Woman's site. That woman can cook!

Rather than re-post her recipe (which you can get to via the above link), I'll just post a few pics of the easy steps and tell you how I improvised, since I didn't plan this one in advance, and....HELLO....we're having an ice storm! ;)
I made just 2 chicken breasts. I don't own a meat tenderizer (need to get one of those!), so I used my can of crushed tomatoes to smash the chicken flat inside a gallon size ziploc bag.
BEFORE

AFTER

Salt, Pepper, Flour dredge Mmmm...olive oil and butter. 4 minute each side, then keep warm.

Mmmm...olive oil and butter. 4 minute each side, then keep warm.Then saute onion and garlic in the oil. I didn't take a picture of the next step, which is adding red wine to the onion/garlic and simmering to reduce. I'm not a fan of the red wine flavor, so I substituted a pomegranate juice blend I happened to have in the fridge.
I didn't take a picture of the next step, which is adding red wine to the onion/garlic and simmering to reduce. I'm not a fan of the red wine flavor, so I substituted a pomegranate juice blend I happened to have in the fridge.After it's reduced, you add crushed tomatoes and simmer for 30 minutes. I also didn't have 3 cans of crushed tomatoes, so I just pulsed some diced tomatoes in the blender for a few seconds. Viola!
 Put the chicken into the sauce and sprinkle with parm. Simmer for a few minutes.
 Serve over linguine. I used angel hair because that's what I had.
 Wow. The Pioneer Woman is a genius. This was SO good!
 Put the chicken into the sauce and sprinkle with parm. Simmer for a few minutes.
 Serve over linguine. I used angel hair because that's what I had.
 Wow. The Pioneer Woman is a genius. This was SO good!
Subscribe to:
Posts (Atom)